Friday, May 15, 2015

How to- Truck Bed Extender

Originally posted on yakangler.com
Getting There and Back – Bed Extenders
For those of you truck owners looking for a way to transport your kayak, there may be no simpler way to do it than with a bed extender. The handy bed extender has been my method of transportation for the last three years. As with anything in life, there are pros and cons.
Pros: Cheap, Little to no modification to your vehicle as long as you have a trailer hitch already installed, ease of loading/unloading.
Cons: Additional Risk of someone rear ending you
Let’s talk about how to transport your kayak safely when using one. First things first - get a long-load safety flag of some kind. This does not have to be anything fancy. Jackson Kayak gives you one when you purchase one of their boats, and I still use mine. I tie mine off to the front handle of my Native Watercraft “Slayer Propel 13” to give people behind me a little more warning. [Note: In most states, a warning flag is required when any object extends a certain distance past the rear of your vehicle, and/or at a certain angle. Make sure to check and comply with state laws where you travel. IR
Next, put some reflective tape on your bed extender. I am routinely on the road well before sunrise, and as with the long load flag I am trying to get others’ attention as much as possible.
Get some quality straps and use at least three for securing your boat. My setup is simple when I cinch down my boat: One strap on the front handle, putting pressure towards the front of my vehicle; another strap on the rear handle applying pressure to the rear; and one more strap across the middle. I say use three, because if one fails the other two will be able to handle the load and keep the boat from moving back and forth, or - God forbid- being launched onto the pavement.
Here is my step-by-step guide how I use my bed extender to load my kayak: Line your boat up centered with the middle of the bed extender. You can load bow or stern first. I load stern first due to the exposed rudder of the Slayer Propel 13.
Undo your strap on your cart (if you use one) and lift the kayak onto the bed extender. Do not try to get the boat fully into the bed at this point.
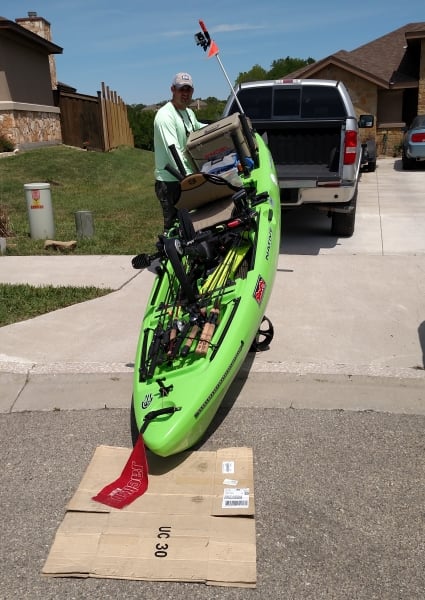
(Tip: I use an old cardboard box under the bow of my boat when I do this step. This lessens the wear and tear on the boat when you slide it on rough pavement or gravel.) Go to the opposite end of the boat. Using the bed extender as a pivot point, lift with your legs and push the boat fully into the bed.


Now that the boat is fully in the truck bed, begin strapping your kayak down using the three straps as mentioned above. Here are pics of how I strap my kayak down.


I hope this helps anyone looking to use a bed extender. This is a cheap and effective way to transport your kayak if you already own a truck.

Saturday, May 2, 2015

Initial Impressions of the Wilderness Systems ATAK


At the recent most Austin Canoe and Kayak (ACK) demo days in Austin, TX I was able to test paddle the prototype Wilderness Systems ATAK. I had only seen the pictures and videos on the Internet prior to that day and this was my first real look at Wilderness Systems newest boat. At first glance, I thought it resembled the Feel Free Lure 13.5 quite a bit. As with any review I do on a boat, I look at four categories; speed/tracking, stability, comfort and "fishability."

Speed/Tracking: It was a completely calm and flat day on the reservoir where the demo days were at, so my experience should be taken with a grain of salt. At just over 14 feet in length and 34 inches wide, the ATAK paddles fairly well. For comparison sake, I would say that it feels much like a Ride 135, but has a little more top speed and I would feel comfortable paddling it 5+ miles. As for tracking, no issues there, but again it was a calm day with no current or crosswind to assess it in. Due to the ultra low profile on the water, I have a feeling that the wind will not affect the ATAK as much as other yaks.

Stability: Top notch, stood up in it on the first try and it was so stable that I even began working a top water lure with no issues. The cockpit is completely wide open and enables you to keep your feet fairly wide apart giving you a good solid base. In the high seat position, I felt no difference in stability due to the higher center of gravity and in the low position you feel like you are on a pontoon boat.

Comfort: The new Wilderness Systems frame seat is now my second favorite behind the Feel Free Gravity Seat. It took Wilderness a while to come up with a frame seat, but the wait was worth it! Low and high positions are easily changed on the water and the seat is mounted on tracks which gives you the ability to trim it fore and aft. Again, the cockpit is wide open, a feature I really like because it gives you the ability to stretch out and move around some.


"Fishability": From bow to stern, this boat is built for fishing. A Large bow hatch is present with a large cover, perfect for breaking down your cart or storing a large fish bag. The sonar pod has been carried over to the ATAK as with other Wilderness Systems boats and can fit the largest of transducers. Gear Tracks are present on left and right sides and run almost all the way from your feet to your seating position, giving you ample space to mount any of your favorite rail adapters. Just behind the seat is an area where only a crate would be able to fit. This is not the norm in fishing kayaks today, but that is because the ATAK has a hinged cover at the rear most of the boat for storing your rods during transport. The cover appears to be the exact same as the center console cover on the Thresher series of kayaks. Some will love this feature and other will hate it. I am not opposed to it, but at this time, I think I would of rather had the extra space.

Wilderness Systems has once again launched a feature packed boat for a certain niche of the kayak fishing community. The ATAK is going to be a flats and bass fisherman's dream.