As usual, my Christmas wish list was mostly composed of kayak fishing accessories. I am more than grateful for my family's appreciation for my hobby. Here is what I got:
Engel Cooler Bag: I have been wanting once since they were released a while back. There are many times that I would rather the soft sided cooler over the hard UC30 that I currently have. The book bag straps and the ability to hold ice just like a hard sided cooler make this thing super versatile. Not only at home on the kayak, this cooler bag is going to accompany us on beach trips, road trips, camping, etc.
Berkley Aluminum Pliers: After going through several cheapo pliers I have had enough. Hopefully these solve that problem. Aluminum base and stainless steel jaws, plus a braid cutter built in. What else do you need in a set a pliers?
Sealskinz Waterproof Gloves: Another item that I have been watching for a while. Frost bitten fingers while trying to fish are the worst. These things are 100% waterproof and windproof and do an ample job at not cutting down your dexterity too much. Plus they work with touch screen devices! Time will tell if they solve all my problems with gloves and cold weather fishing.
Oakley Radar Lock Customs: Pretty obvious gift here. I have been using the same set of Oakley's for the last 5 years, so it was just time for an upgrade. Leave it to my wonderful wife to go all out and get me a custom pair. If you haven't fished with a quality set of sun glasses, I highly recommend you upgrade. Once you do, you will never go back. Oakley is my brand of choice.
Kokatat Hydrus 3L Dry Pants: Tired of cheap stocking foot chest high waders, I decided to ask for a quality pair of dry pants. Two reasons why I asked for a set of dry pants this year. First, I don't wade at all, so I felt there was no need for a pair of chest highs. Two, I hate stocking foot wader made with neoprene. Your feet get soggy and they smell really bad after a days use. The Kokatat pants have waterproof socks built in with a nice pair of ankle cuff that solve that problem.
I can't wait to put these gifts to good use. I will be sure to give them an honest assessment in the future.
When I first received my vapur anti-bottle I thought how clever the idea was, but questioned the durability. Come on. Really? A plastic bag for a bottle. No way that can hold up to the punishment that yak-anglers put on their equipment. After three weeks of continued use I have been surprisingly incorrect. If Mossy Oak agrees to allow someone to use their patterns you bet that it is built tough and the vapur bottle sure is tough.
From the kayak to the powerboat and even in the field hunting, the vapur bottle is adaptive and rugged enough to handle it all. The container itself is simple and impressive. All of the seams are watertight and finished with no sharp edges. Each seam has a generous overlap of material that can handle rugged conditions. The cap is impressive as well. A screw in type with an o-ring seal and a super secure closure to ensure no spills. An added benefit is an integrated locking ring to secure your anti bottle to whatever you need. The coolest thing about the anti bottle is the portability. When empty you can roll the whole thing up to fit into your cargo pocket. A great feature for cramped kayaks.
My only complaint is the capacity of the anti bottle. On an offshore trip in Florida I found myself constantly refilling the bottle. The .7L capacity just wasn't enough for me even on a 75 degree fall day. The good news is that there is a 1L anti bottle, but not available in the mossy oak pattern yet.
Some ways to improve the anti bottle would be with the addition of vapur's available filtration systems. Maybe there could even be an opportunity to add a lifestraw attachment that could be used to drink from unsanitary sources for all the survivalists out there. I gave the vapur anti bottle 4/5 stars. My only issue is the capacity, but for kayak anglers with limited space this is a tremendously innovative way to meet your hydration needs.
I will admit that for the vast majority of my time fishing from kayaks I have concentrated all of my efforts near the shoreline. Sky high temperatures in Central Texas and a lack of bites where I normally fish have pushed me away from the bank and in search of underwater structure.
Two things that you will need to make this transition are a marker buoy and either an contour lake map or an app such as navionics for your fish finder or mobile device. I am running navionics on my iPad in conjunction with my vexilar sonarphone fishfinder. With the iPad GPS and the navionics app I know exactly where I am at and where I am in relation to the underwater structure that I am wanting to fish. Couple that with the marker buoy serving as a casting target and you have a perfect combination for fishing structure.
By no means did I invent this method. Pro Bass Fisherman have been using it for years, but I have rarely seen kayak anglers employing this method out on the water or in videos. It was something that I was reluctant to try, but after success on my first outing trying this method, I will be sure to use it a lot more. Check out the video to see how it works.
Ever since hooking into a hybrid striped bass on Lake Decker this spring I have been patiently researching and studying the Striped Bass and the lakes that are fortunate enough to be stocked with these amazing game fish in the Central Texas area. Luckily, there is a Striped Bass paradise not all too far from me; Lake Buchanan.
Lake Buchanan is a very large lake located just west of Burnett in the Texas Hill Country. Stocking of Striped Bass in Lake Buchanan are extremely successful and with the help of TPWD and private organizations, the Striped Bass population has survived the droughts and recent flooding. I initially knew nothing about how to target Striped Bass. I began searching YouTube and the Internet to figure out some tactics. Oddly enough, Barry Stokes, host of Fox Sports Outdoors Southwest has done a show on Lake Buchanan and had some really great tips on how to target Buchanan's stripers.
Not having any of the requisite tackle, I started to search my local shops. Not many stores carry striper specific lures where I live, but, luckily there is some crossover with traditional black bass tackle that will work. I decided to go with 5" and 4" flutter spoons, a heavy jig with a soft plastic swim bait trailer, a bucktail jig and a traditional deep diving crankbait in natural shad colors.
By far the most successful method I learned is referred to as the smoke method. You cast the flutter spoon out, let it sink to the bottom and begin a steady retrieve of about 6-10 cranks. Disengage the clutch, let the spoon fall back to the bottom and repeat until you are no longer retrieving the spoon horizontally.
The striped bass is an amazing fighter regardless of the size. This species is a true challenge to any angler. I logged 50 plus miles on my three outings to Lake Buchanan and on my last trip I finally caught one. My best piece of advice is to do your research on a contour map. Pick several humps throughout the lake and either confirm or deny activity on your fish finder or by feeding on the surface. If it doesn't have activity, move to another spot. Resist the urge to fish an area just because it looks good on the map. Don't pickup a rod until you are in the right spot.
Well, it has been a while since I have been able to blog. With a new baby, my recreation time has been cut down some. The better half decided to visit family and it was way too expensive for both of us to fly, so a fishing weekend was planned. I have always wanted to visit Lake Victor Braunig that lies just to the southeast of San Antonio. This is one of two lakes that were created in the area to cool the power plants on their respective shorelines. The water in the lake stays warm year round and on this fishing day, the surface temperatures were around 91-95 degrees. This opens up the opportunity for Redfish to reside here. Even though they cannot reproduce in the lake, they are able to thrive all year long due to the higher temperatures.
After doing some research and soliciting some advice from locals, I decided that I would try to troll the rocky dam area. After selecting some lures the night before I was all ready to go. After the 2 1/2 hour drive I unload the yak and stepped into the water. I was amazed at how warm it was, almost like your first dip into a hot bath. I trolled around for about 2 hours without a bite. I changed lures a few times and I began to target just above and below the thermocline. My fish finder was showing the thermocline just below 15 feet of water. After another hour I still did not have a redfish to show.
I decided to switch up tactics at this point. I moved over to the eastern side of rock jetty that is in the center of the lake. It is a gradual drop off in this area and I figured that reds may be lurking around the deeper edge of the drop off and ambushing bait in the shallows. I was correct about the bait, there was surface activity all around and I knew I was in a good place. I began casting two different jigs with soft plastics. I was sitting in 8-10 feet of water and casting into the drop off. While I still was not able to hook into a freshwater redfish, I was rewarded with two nice sized catfish.
Lake Braunig is an exciting new lake for me and I intend to visit again. The thought of a bull redfish has not left my mind since the trip and I cannot wait to go back. Until next time enjoy some battles with a few catfish who wanted to play.
For about the past two years I have been fishing out of one of the heaviest fishing kayaks on the market, the Native Watercraft Slayer Propel 13. As nice as the Native Slayer Propel is, the weight was starting to take its toll on me. Pedaling was also nice, but I truly started to miss the rhythmic zen that only an efficient paddling stroke can provide.
Flash back to two years ago when I was looking for a new kayak, I came across the Hurricane Skimmer 128. A lightweight piece of beauty laid before my eyes in a breathtaking lime green over white color. This was my first experience with a thermoformed kayak and I could not believe how light it was. I thought to myself that a cart just became obsolete because I could throw this thing over my shoulder and walk to the water.
When I finally got the boat into the water, the honeymoon began to wear off a little. At 28" wide and 12'9" long, the Skimmer 128 was coming up a bit short on width and length for me. Even with the shorter length and width I still thought that the Skimmer 128 was a rocket ship compared to most of the kayaks I had paddled previously. At that time the Skimmer 140 was not available for sale and I just couldn't wait, so I looked elsewhere and purchased the Slayer Propel 13.
The thought of paddling the Skimmer 140 never left my mind and after applying for a Pro Staff position with Hurricane Kayaks, I was gratefully rewarded with the opportunity to represent a fine American company and the opportunity to fish from a Skimmer 140. My first two outings in the Skimmer 140 have been very successful and I look forward to building more memories with this fine kayak. Here is my review of the Skimmer 140:
Speed/Tracking: A+, this is the focal point of the Skimmer 140. The lightweight savings of the thermoforming process clearly set this kayak apart from its competitors. I was amazed at how responsive the Skimmer 140 was and how quickly it accelerated to it's hull speed from a dead stop. While I have not installed a GPS yet to give you an accurate speed measurement, I can tell you that I was moving from spot to spot faster than my old Slayer Propel 13. The Skimmer 140 also tracks extremely well. A pronounced sharp bow and a defined keel line keep this kayak straight even in a crosswind. While I do have the installed rudder, I haven't used it yet, that says a lot about the hull design of this boat. The winds have been relatively tame during my outings, so maybe when the winds get above 10 mph I may need to exercise the rudder.
Comfort: With anything in life, there is usually a trade off somewhere. With the Skimmer series, there is definitely a trade off between weight and some other nice to haves like a frame seat. To keep the weight down, the Skimmer has a built in back support and a padded seat that is flush on the deck. While not as comfortable as the other frame lawn chair style seats on the market, the combination of the padded seat and the adjustable back support meet my needs of comfort for an all day fishing trip. The cockpit on the Skimmer 140 has plenty of leg room and lends itself nicely to kicking your legs over the side to stretch out every once in a while.
Stability: At 29" wide, the Skimmer 140 is not going to feel like a Jackson Big Rig. I will admit that at first the boat did feel a little "tippy" to me. I attribute that to the "muscle memory" from my previous kayak and after around 3 hours in the Skimmer 140 that feeling completely went away. There is a fine line between the initial and secondary stability of the Skimmer, but once my body learned the boundaries I had no problems turning around for rods or sitting side saddle. About halfway through my first fishing trip a bass boat buzzed by me and threw a significant wake. As I braced myself for the impacts I was surprised at how well the Skimmer lifted and settled as the rollers went by. I hope to challenge this boat in the surf and offshore someday.
"Fishability": The base model Skimmer is pretty much a blank slate for the Kayak Rigging enthusiast. Flat surfaces are everywhere on the kayak allowing for easy mounting solutions for rod holders, rails and anything else you can imagine. There is an angler package complemented by three rails in the cockpit and two in the tank well as well as an anchor trolley and a rudder option. With a few Scotty rod holders, track adapter and a few other items, you are all set.
Last summer I decided to buy a nice pair of water shoes. With a Columbia outlet not to far from my house, I invested in a pair of Drainmaker IIs. After fishing with my new water shoes for half a season I started to dislike wearing them with just my bare feet. The feeling of my wet bare skin combined with the accumulation of the dirt, rocks and grime that added up inside the shoes drove me crazy. I looked for a pair of socks that would help to solve my issue as well as provide additional sun protection for my ankles.
As I did some research I stumbled across diving socks. I decided to give a pair a try, but unfortunately they only solved one of the problems I was having. A little discouraged, I continued to use the diving socks and just dealt with my feet being constantly soaked and my skin all "prunny" after a day on the water.
Then one day I was told about Farm to Feet, a 100% American made sock that was designed for outdoor enthusiasts and perfect for kayak fishing. After receiving two pairs for testing, I eagerly waited for the weather to clear. Luckily I had a monday off work and the weather turned out to be perfect, so off I went armed with my Drainmakers and my new Farm to Feet 1/4 crew socks. The first thing I noticed about these socks when I began to remove them from their packaging was how light weight they were. As I slid them onto my feet I was greeted by a cooling sensation and a feeling of comfort. The socks are so lightweight that I felt like I was still barefoot.
After arriving to the boat ramp and getting my kayak set up, I stepped into the water for the first time armed with my new socks. Even wet, these socks still felt extremely comfortable. Very quickly after entering the water I realized that my feet were already starting to dry and that wet sensation that I constantly had with my diving socks was no longer there. Several times during my outing I dunked my feet into the water to cool off a bit from the muggy Texas conditions that day. Each time I submersed my feet I was extremely surprised how fast my feet were drying out . The combination of the Farm to Feet socks and my Columbia Drainmakers are a Kayak Fisherman's dream.
While I have only made two trips with these socks I can tell you that they have quickly made a difference in my comfort on a long day of fishing. They are 100% made in America by American Workers and come in at a very reasonable price. In a world full of non-American products overtaking the shelves, its good to see a Company proud to be American made. Check them out at: http://farmtofeet.com
For those of you truck owners looking for a way to transport your kayak, there may be no simpler way to do it than with a bed extender. The handy bed extender has been my method of transportation for the last three years. As with anything in life, there are pros and cons.
Pros: Cheap, Little to no modification to your vehicle as long as you have a trailer hitch already installed, ease of loading/unloading.
Cons: Additional Risk of someone rear ending you
Let’s talk about how to transport your kayak safely when using one. First things first - get a long-load safety flag of some kind. This does not have to be anything fancy. Jackson Kayak gives you one when you purchase one of their boats, and I still use mine. I tie mine off to the front handle of my Native Watercraft “Slayer Propel 13” to give people behind me a little more warning. [Note: In most states, a warning flag is required when any object extends a certain distance past the rear of your vehicle, and/or at a certain angle. Make sure to check and comply with state laws where you travel. IR]
Next, put some reflective tape on your bed extender. I am routinely on the road well before sunrise, and as with the long load flag I am trying to get others’ attention as much as possible.
Get some quality straps and use at least three for securing your boat. My setup is simple when I cinch down my boat: One strap on the front handle, putting pressure towards the front of my vehicle; another strap on the rear handle applying pressure to the rear; and one more strap across the middle. I say use three, because if one fails the other two will be able to handle the load and keep the boat from moving back and forth, or - God forbid- being launched onto the pavement.
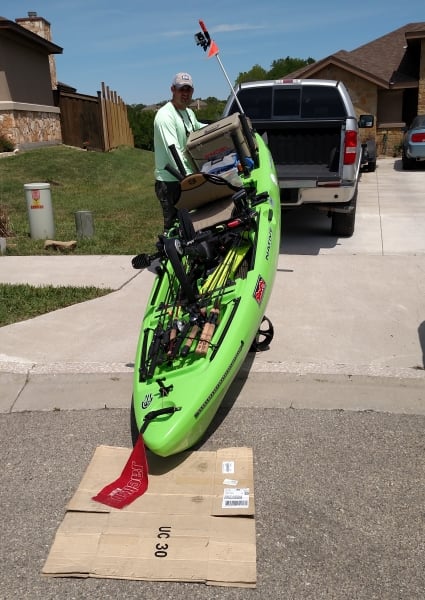
Here is my step-by-step guide how I use my bed extender to load my kayak: Line your boat up centered with the middle of the bed extender. You can load bow or stern first. I load stern first due to the exposed rudder of the Slayer Propel 13.
Undo your strap on your cart (if you use one) and lift the kayak onto the bed extender. Do not try to get the boat fully into the bed at this point.
(Tip: I use an old cardboard box under the bow of my boat when I do this step. This lessens the wear and tear on the boat when you slide it on rough pavement or gravel.) Go to the opposite end of the boat. Using the bed extender as a pivot point, lift with your legs and push the boat fully into the bed.
Now that the boat is fully in the truck bed, begin strapping your kayak down using the three straps as mentioned above. Here are pics of how I strap my kayak down.
I hope this helps anyone looking to use a bed extender. This is a cheap and effective way to transport your kayak if you already own a truck.
At the recent most Austin Canoe and Kayak (ACK) demo days in Austin, TX I was able to test paddle the prototype Wilderness Systems ATAK. I had only seen the pictures and videos on the Internet prior to that day and this was my first real look at Wilderness Systems newest boat. At first glance, I thought it resembled the Feel Free Lure 13.5 quite a bit. As with any review I do on a boat, I look at four categories; speed/tracking, stability, comfort and "fishability."
Speed/Tracking: It was a completely calm and flat day on the reservoir where the demo days were at, so my experience should be taken with a grain of salt. At just over 14 feet in length and 34 inches wide, the ATAK paddles fairly well. For comparison sake, I would say that it feels much like a Ride 135, but has a little more top speed and I would feel comfortable paddling it 5+ miles. As for tracking, no issues there, but again it was a calm day with no current or crosswind to assess it in. Due to the ultra low profile on the water, I have a feeling that the wind will not affect the ATAK as much as other yaks.
Stability: Top notch, stood up in it on the first try and it was so stable that I even began working a top water lure with no issues. The cockpit is completely wide open and enables you to keep your feet fairly wide apart giving you a good solid base. In the high seat position, I felt no difference in stability due to the higher center of gravity and in the low position you feel like you are on a pontoon boat.
Comfort: The new Wilderness Systems frame seat is now my second favorite behind the Feel Free Gravity Seat. It took Wilderness a while to come up with a frame seat, but the wait was worth it! Low and high positions are easily changed on the water and the seat is mounted on tracks which gives you the ability to trim it fore and aft. Again, the cockpit is wide open, a feature I really like because it gives you the ability to stretch out and move around some.
"Fishability": From bow to stern, this boat is built for fishing. A Large bow hatch is present with a large cover, perfect for breaking down your cart or storing a large fish bag. The sonar pod has been carried over to the ATAK as with other Wilderness Systems boats and can fit the largest of transducers. Gear Tracks are present on left and right sides and run almost all the way from your feet to your seating position, giving you ample space to mount any of your favorite rail adapters. Just behind the seat is an area where only a crate would be able to fit. This is not the norm in fishing kayaks today, but that is because the ATAK has a hinged cover at the rear most of the boat for storing your rods during transport. The cover appears to be the exact same as the center console cover on the Thresher series of kayaks. Some will love this feature and other will hate it. I am not opposed to it, but at this time, I think I would of rather had the extra space.
Wilderness Systems has once again launched a feature packed boat for a certain niche of the kayak fishing community. The ATAK is going to be a flats and bass fisherman's dream.
One of my goals this fishing season was to become active on the Central Texas kayak tournament fishing scene. After some research of what was available in my area, I selected the dates that I thought were reasonable to participate in with my work schedule. All the dates that I selected were on Saturdays, the typical day that I go fishing anyways.
The first thing that I realized about tournament fishing is that it takes an extreme amount of commitment. The money is one such commitment; not only do you have to pay the required entrance fee, but there may be a membership fee just to join the circuit. Include transportation fees, new lures and other tackle and your looking at hundreds of dollars spent on one Saturday tournament. Now the good news is that if you are a really good fisherman, you can recoup some of those costs. With two tournaments under my belt, I have had no luck thus far. Hopefully I can change that in the future.
Another thing to consider is time. While the tournaments I have decided to participate in are one day events, I have also made the decision to attempt to pre-fish each lake at least once before the event. Careful scheduling must be done to ensure that you are leaving enough blank space on your calendar for pre-fishing days while not allowing yourself to go into a tournament "cold turkey" on a lake you have never seen before. Easier said than done.
I am really looking forward to the upcoming events I have planned. While I haven't won any money or prizes yet, I have met a lot of great people and seen interesting rigging ideas and fishing tactics that make me a better kayak angler. If you haven't participated in a kayak fishing tournament, check one out, at the least you will meet some awesome like minded people to share your addiction with.
After a month away from home training in the People's Republic of California, I took a much needed fishing trip this weekend. My destination was Lake Walter E. Long, also known as Lake Decker and referred to as Decker more often than not. I have fished this lake before and had decent success. Walter E. Long is a power plant cooling lake and is known for a healthy black bass and hybrid striper population. I was on this particular lake practicing for the upcoming Kayak Angler Tournament Series (KATS, fishkats.com). After finding some good hiding grounds for bass I decided to troll for a while until I made it to the next destination I liked on my gps. I have never caught a decent sized hybrid striper and I knew that this lake was known for 5+ pounders. I gained some speed tossed out a chrome and black lipless crank and tried to keep a smooth 3 mph. Around 10 mins elapsed and sure enough my Scotty Rocket Launcher struggled to hold onto my rod as that lipless crankbait was engulfed. I could tell that this was a decent sized fish and it was definitely not a bass. Check out the video! I may have to start targeting these guys more often.
A gorgeous February weekend in Central Texas gave me some motivation to work on the yak. The winds were gusting to 25 mph, so fishing was out of the question. Sitting under my workbench lay the last of my kayak fishing Christmas gifts; Supernova Green LED strips. Pretty straight forward kit with very few steps for a solid install and decent instructions. The hardest thing is probably the wiring. If you have no automotive wiring experience, it may take you a little longer, especially if you have never soldered before.
I started off by temporarily mounting the strips to the bow with some leftover painters tape I had laying around. The Slayer Propel has a nice manufacturing line in the plastic that I used for my straightedge as is looks identical on both sides. Once the strips were in place I drilled the requisite 3/16" hole approximately 1/4" from the end of the heat shrink that is installed on the strip. Now it is time to run the wires and connect everything to the switch and battery.
For my wiring I ran both wires up to my battery that is secured in the Native Battery Bag underneath the plastic cover below the thwart bar that secures the propel drive. The ground wires are simple; connect both to the battery. As for the power wires, simple switch wiring. Take the power from the battery to one side of the switch and from the opposite side of the switch to the supplied fuse, then to the power wires of both strips. With the wiring complete, all you have to do is mount the switch and permanently attach the LED strips to the hull. Supernova provides a package of 3M adhesion promoter. Apply that sparingly to the areas the strips will mount to and allow to dry for 3 minutes. Once the time is up, peel back a small portion of the protective coating on the back of the strips. Apply to your line and gently press down while continuing to remove the backing until you get it completely off. Last thing to do is to silicone up the 3/16" hole that you ran your wiring through.
Check out the short install and walk thru video. Can't wait to try them out on the water.
Should every kayak fisherman have a safety flag and 360 white light? My answer used to be no and I went all of last season without one. Why am I writing about one now you may ask? Because you can never be too safe! Especially if you fish where I do and it is you versus 300 horsepower bass boats doing 80 mph all over the place. I had too many close calls last season to not arm myself with every safety gadget I can get my hands on. So, in comes the ingenious Scotty 828. Safety Flag, 360 White light and a great place to mount your GoPro. Everything a kayak fisherman needs. Just like every other great Scotty product, the 828 can mount into any scotty base. I plug mine right into a Scotty 438 track adapter on my tank well rails for ultimate adjustability.
Another added feature of the 828 is the ability to mount the Scotty 135 camera mount to it. By having your GoPro or other brand of camera mounted high on the top of the pole, you get a great look down angle into your cockpit and an awesome view to the front of your boat. I tested it out for the first time this weekend and love the view and can't wait to get some fish in front of it. Two great products from Scotty that will keep you safe and add to the quality of your videos. Check out a quick walk thru video of the two products.
A gorgeous weekend in central Texas opened up an opportunity to get out on the water and I was sure to take advantage of it. Fishing in January is not something I am used to and I definitely need to learn some winter time tactics if I actually want to catch some fish; sadly I caught zero, skunk city. I did however get a chance to use some great products I got as gifts for Christmas. One such item is the Buff UVX Mask. Not just your ordinary piece of fabric that fishermen wear around their necks, the UVX mask is purpose built for all around protection. The biggest advantage to the UVX mask is the ability to tuck it under your shirt. If your wearing a collared shirt, no big deal, but I usually wear a moisture wicking long/short sleeve and I would routinely get sun burn on my neck where my previous Buff failed to cover. Another added feature is the breath holes that don't fog your sun glasses up as much. It doesn't completely stop it, but the holes are sure better than just a solid piece of fabric. Lastly, the UVX is super soft and has extra material that clings to the back of your head for the perfect fit. Little touches, but these added features put the Buff UVX Mask above all others. If you are fair skinned and don't play nice with the sun like me, the Buff UVX Mask is a perfect option for all day comfort and sun protection for fellow kayak anglers.
For the last two years I have been using, what seems to be the kayak fishing standard of the anchor trolley, 3lb claw anchor and about 25 feet of nylon rope as my anchor system. Don't get me wrong, this system works and doesn't set you back a whole ton of money, but there is always room for improvement. With that being said, I have searched for some different options for a while now. The two options that I really like that have come onto the scene fairly recently are the Powerpole Micro and the Anchor Wizard. Polar opposites in price, the Powerpole Micro will set you back around $600 when all is said and done and the Anchor Wizard around $150. The Powerpole is a little steep in price for me right now and I figured the Anchor Wizard may make a good Christmas present this year. From my previous post ( http://catchmeifyoupaddle.blogspot.com/2014/12/christmas-kayak-fishing-gifts.html), you can see that I was a good boy and got an Anchor Wizard as a present.
Winter time means rigging season for most of us and since I am not able to fish right now, I quickly got the itch to work on the yak. Installing the Anchor Wizard onto the Slayer Propel is almost bolt on and go. The mounting of the spool is extremely easy due to the factory installed rails in the cockpit and the track adapter hardware that is supplied with the Anchor Wizard. The obstacle becomes the mounting of the chute onto either the bow or stern of the boat. Once again, factory installed equipment helped solve the problem. The padded carry handles that Native supplies on the Slayer Propel are bolted on by hardware and sturdy brass inserts. Having that feature, I decided to use the hardware and brass inserts as a mounting point for my Anchor Wizard. The problem now is that you only have one mounting point connected to the chute of the Anchor Wizard which is just not going to cut it. To solve this final problem, I dug into my scrap metal bin, found some aluminum and made a bracket to connect the other brass insert to the second mounting hole on the Anchor Wizard. With two solid connections and a brace between them, my Anchor Wizard is now rock solid and ready to help catch some fish. I can't wait to try it out and do some reviews on it. For now, enjoy the installation video.